 CSS is an absolute website beautifier, with Cascading Style Sheets (CSS) you can make your website just appear like anything you want. Hope most of you know about fundamental CSS rules, so what we are here to refer is about CSS selectors. Here we will explain some familiar CSS selectors and along with that we will also make you understand what ‘>’, ‘+’ and ‘~’ symbols mean in CSS selectors.
CSS selectors for beginners
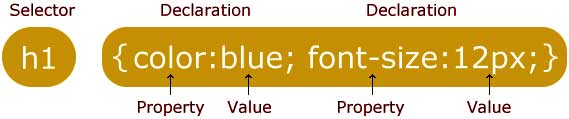
In order to style particular element in your website you have to first find out the selector. In CSS, “selector” is an instruction that tells web browser which element to style for that particular CSS. All HTML element that starts with opening tag <> and ends with closing </> tag are selectors (for example: <h3>Some Text</h3>, <a href=”http:/ /site.com”>Some Link</a>). Other than that there are element selector (p{}), id selector (#container{}) and class selector (.widget box title{}). In the example below you can see the selector that is before the opening brace (.h2 posttitle). Alright, here we will describe CSS selectors one by one in order and this post is for absolute beginners.
.h2 posttitle {
text-align: center;
color: blue;
font-size: 32px;
}
Universal selector (*)
Yep, it is global and a powerful selector that targets each and every element on the whole document and it is applied using asterisk symbol ( * ).
* {color: green;}
Assume that the HTML document contains elements like h1, h3, paragraph, ordered list, unordered list and preformatted text. So you want to apply green color to all those elements, so instead of writing CSS like this (body, h1, h3, p, ul, ol, li, pre{color: green}) you can use the universal selector.
Element type selector
Element type selector matches every HTML elements in the document tree by its tag name. For example you have a page with three h2 headings (<h2>Some H2 text</h2>), so adding the below CSS applies to all h2 tags.
h2 {
font-color: #444;
font-family: helvetica,sans-serif;
}
ID selector – #
Id selector are identified using pound # sign and it matches an HTML element that has ID attribute defined.
For example you can style this element <div id=”bodyblock”></div> by applying CSS like this.
#bodyblock {
Padding: 15px;
Width: 70%
}
Class selector – (.)
Id’s are just styling single element but on the other hand classes are used to style the group of elements that has a same class name defined. This is the most powerful selector which is used extremely. HTML elements have a class defined like this <h2 class=”mainheading”></h2> and it is called using css .mainheding like this.
.mainheading {
Text-align: center;
}
Descendant selector
Descendant selector matches all the elements that are descendants of the defined element; it targets the nested ones by separating two selectors using blank space. For example you know that you can nest HTML elements inside one another like this.
<div>
<h2>First Heading</h2>
<div>
<h2>Second Heading</h2>
<div>
<h2>Third Heading</h2>
</div>
</div>
</div>
So to style just the third heading you can use descendant selector like this.
div div div h2{
color:red;
}
Attribute selector
CSS can target HTML elements using their attributes for example:
<form>
  First name: <input type="text" placeholder="Name"><br>
  Your Email: <input type="email" placeholder="your email"><br>
  <input type="submit" value="Submit">
</form>
To style the submit button you can use CSS like this.
input[type=submit] {
Width: 30%;
Cursor: pointer;
Color: #fff;
Background-color: #000;
}
Understanding ‘>’, ‘+’, ‘~’ symbols in CSS selectors
Alright we have seen the basic and most used CSS selectors, other than this there are pseudo-class and pseudo-element selectors which we are not going to discuss here. Most beginners confuse greater than >, plus + and tilde ~ symbols in CSS selectors, so here lets see that in brief.
Child selector ‘>’
This selector selects the direct children’s of the particular element. For example take a look at the HTML and CSS below. The CSS #sample > h2 just targets the immediate child of div id sample that is the rules will be only applied to first heading and third heading and not the second heading which is nested inside.
————-HTML
<div id="sample">
       <h2>First Heading</h2>
                  <div id="block">
                  <h2> Second Heading</h2>
                  </div>
       <h2> Third heading </h2>
</div>
————–CSS
div#sample > h2 {
background-color: yellow;
color:blue;
font-size: 22px;
}
Adjacent sibling selector (+)
Adjacent sibling combinator uses + sign that targets all selectors having same parent but the target is immediate sibling that is it selects all elements that comes next to the first one.
<div>
<p>Para One</p>
<p>Para Two</p>
<div>block</div>
<p>Para Three</p>
<p>Fourth Para</p>
</div>
From the example above if we use selector like p + p {} it only gets applied to para two and fourth para. And if we remove that div block then the CSS will be applied to second para, third para and fourth para, leaving the first one.
p + p {
background-color: yellow;
color:blue;
font-size: 22px;
}
General Sibling Combinator
General sibling selector uses ~ tilde symbol and it is similar to adjacent sibling selector, but the thing is the second selector doesn’t have to immediately succeed the first one. It means it selects every element after the former selector. Take the above HTML what we used for adjacent sibling selector as an example. Now the below CSS will only be applied to second para, third para as well as fourth para.
p ~ p {
background-color: yellow;
color:blue;
font-size: 22px;
}
Hope as a beginner you have understood common CSS selectors and when to use ‘>”, ‘+’ and ‘~’ symbols. CSS are very fun to learn and implement, try playing with CSS in your website and you will grasp it very easily and also try to use browser developer tool (CTRL + Shift + I) which will be helpful to play around with css. This is our first CSS tutorial and in next coming days we will be posting a lot of HTML and CSS tutorials, so to receive more such updates subscribe to our feeds or follow us on Facebook, Twitter and Google Plus.